For businesses that sell physical products, inventory stocktake, also known as inventory counting, plays a pivotal role in effective inventory management. It involves assessing the quantities of goods and materials in a company's inventory, offering a snapshot of stock levels. This not only enables informed decision-making but also aids in accurate tax reporting.
Effective inventory management is a critical aspect of running a successful business. In today's fast-paced and competitive market, having your inventory organised and tracked through a dedicated system such as NetSuite is not just convenient; it's essential.
The inventory count NetSuite feature enhances the ability to monitor inventory and asset management control. Once activated, this feature enables you to regularly record the quantities of items on hand, ensuring the accuracy of your inventory. Maintaining precise item counts can lead to a reduction in necessary safety stock levels, ultimately reducing your overhead expenses.
Watch the tutorial or reach on below!
There are 3 ways to conduct stock takes in NetSuite. Let's dive into them.
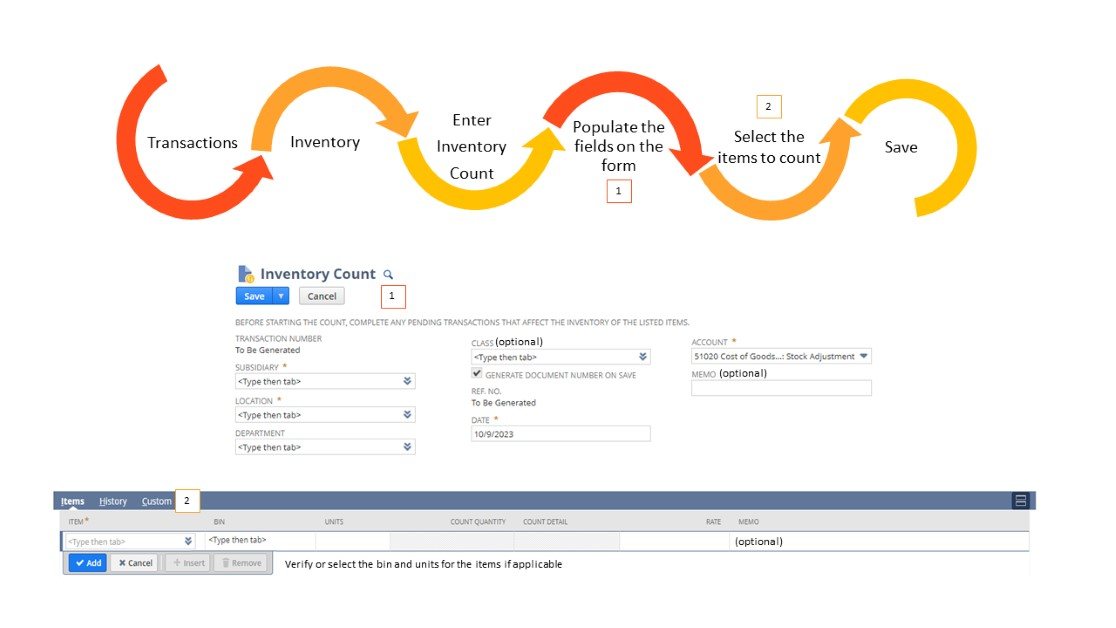
1. Inventory Counts
Once a count date and interval are entered for an item. NetSuite will use them to calculate when an inventory count is required. You can also add a classification on the item record to sort the list and create inventory counts according to your selected classification. You can create inventory counts in two ways:
1.1 Calculated Inventory Counts
- Follow the steps below in your NetSuite account.

Now, the inventory count will have an open status and is a non-posting transaction.
Start the inventory count
- Click the Start Count button at the top of the inventory count record.
- Once the inventory count has started status, you can enter the count quantity based on the physical count for each item.
- Click save.
Complete the inventory count
- Click the Complete Count button at the top of the inventory count record.
- The inventory count will have a pending approval status until a supervisor approves or rejects it and will display the quantity to be adjusted.
- If the inventory count is approved, two inventory adjustments will be created, one with a negative quantity and one with a positive quantity. These can be found under the History subtab > Inventory Adjustments
- If the inventory count is rejected, the record returns to started status, and another count must be conducted.
New inventory counts can’t be started for items on started inventory counts.
1.2 Manual Inventory Counts
- Follow the steps below in your NetSuite account.
Now, the inventory count will have an open status and is a non-posting transaction.
To complete the manual inventory count process, follow the Start Inventory Count and Complete Inventory Count steps previously described in the calculated inventory count section.
2. Physical Inventory Worksheet
This tool allows you to compare your physical inventory count to the inventory count in your account, contributing to maintaining accurate inventory records. This worksheet lists all on-hand inventory and has a column to enter the physical count results. If there are discrepancies between the account’s inventory count and what you have in stock, you can adjust the quantity by creating inventory adjustments.
View Physical Inventory Worksheet
- Navigate to Reports > Inventory/Items > Physical Inventory Worksheet
- Click on the printer icon to print the report.
- Perform the physical account.
- Proceed with any inventory adjustments if discrepancies are found. You can create these adjustments manually or via CSV import.
3. Cycle Count Plans
Cycle count plans are only available with NetSuite Warehouse Management (WMS). With these plans, you can create cycle count plans that act as templates for generating inventory counts. These plans offer a broader range of bin and item filters than those available in manual or automatically calculated inventory counts.
- Follow the steps below in your NetSuite account using the WMS Warehouse Manager role.


Now, the plan is created, and you can generate inventory counts from this plan.
- Navigate to Inventory > Cycle Counting > Generate Cycle Count from Plan
- Plan Number: Select the cycle count plan.
- Count Start Date and Count End Date are optional. These will indicate when you wish to start and complete the inventory count.
- Display

|
|
|
To complete the cycle count process, follow the Start Inventory Count and Complete Inventory Count steps previously described in the calculated inventory count section. Please note that you must also set the count detail for each line in the start inventory count section.
“Just a heads up, if you want to do an inventory count for serialised or lot-numbered items, you'll need to have the Advanced Bin/Numbered Inventory Management feature turned on.”
Stocktakes are routine tasks and strategic imperatives that empower your business to thrive in a competitive marketplace. They provide the means to maintain precise control over one of your most valuable assets: your inventory. With Annexa as your NetSuite strategic partner in inventory management, you can rest assured that this critical aspect of your operations will be efficient and tailored to meet your unique business needs.
Annexa is your trusted NetSuite partner in Supply Chain, Warehouse Management and Inventory Processing. Connect with us for more information.


