A well-configured NetSuite dashboard is a critical component of a successful ERP implementation, providing you with the information you need most - whether that’s instant snapshots of your KPIs, real-time business data and reports, or shortcuts to areas you visit most often.
While we’ve provided guidance in customising your NetSuite dashboard in the past, this time we want to talk about configuring your dashboard to your particular role. The following in-depth walkthrough of dashboard functionality will provide you with many NetSuite hints, tips and tricks to help you get the most out of your ERP. But first, here are some NetSuite CRM dashboard examples for Sales, Marketing and Customer Support:
In this blog:
- Dashboard Tiles
- Reminders
- Key Performance Indicators
- Navigation Shortcuts
- Trend Graphs
- Financial Overview
- KPI Meter
1. Dashboard Tiles
Dashboard Tiles allow you to display your business KPIs in a visual layout with different images, colours and icons. The tiles are made available by downloading a SuiteBundle and include three customisable types - static, reminder and scorecard. Static tiles display a static value, such as a percentage rate or target amount. Reminder tiles display numeric data from a saved search record, such as opportunities to close or sales orders to fulfill. Scorecard tiles also display data from saved searches, however, they show the sum of the first column in the search with numeric values. Scorecards can also be used to compare values.
Installing the bundle:
1. Go to Customisation > SuiteBundler > Search & Install Bundles
2. On the Search and Install Bundles page, use the following information to search for the SuiteApp:
- Bundle Name: Dashboard Tiles
- Bundle ID: 185219
3. Click Navigation Portlet to display its Bundle Details page
- For more information, see Bundle Details
4. Click Install
- If asked, indicate your agreement to allow NetSuite to automatically upgrade the SuiteApp in your account when updates become available
- During the installation, click Refresh to get the latest status
Setting up the Dashboard Tiles
1. Go to Setup > Dashboard Tiles > Manage Dashboard Tiles > New
2. On the Dashboard Tile page, specify values for the following fields:
- Name – Enter a name that describes the static value to be displayed in the tile.
For example, Balance Sheet. - Tile Type – Select Static.
- Display to All Roles – Check this box to make the tile visible to all roles. When this box is checked, the Roles field becomes read-only.
- Roles – Select at least one role that can access the tile. To select multiple roles, press and hold down the Ctrl key.
- Display Order – Enter a numeric value to define the order that the tile is displayed in the portlet. For example, enter 1 to display the tile as the first tile in the portlet.
3. On the Data subtab, specify values for the following fields:
- Display Value – Enter the static value to be displayed in the tile.
- Link – (Optional) Specify the URL to use for the tile. For example, you can enter a saved search URL.
In our example, we’ve taken a custom Balance Sheet Report URL and created a link.
When you click the tile, the system launches URL page. - Prefix – Enter text or characters to append before the tile value
For example, you can use a currency symbol as a prefix - Suffix – Enter text or characters to append after the tile value
For static tiles, the Saved Search field is read-only
4. (Optional) Modify the tile appearance or apply conditional alerts.
- For more information, see Modifying the Appearance of a Dashboard Tile or Applying Conditional Alerts to a Dashboard Tile.
5. Click Save.
6. Repeat for each dashboard tile you’d like to display.
Adding roles that can view the dashboard tiles
1. Go to Setup > Dashboard Tiles > Roles Update.
2. On the Dashboard Tiles Roles Update page, specify values for the following fields:
- Target Role – Select a target role. To select multiple roles, press and hold down the Ctrl key.
- Source Role – Select a source role.
3. Click Run Update.
4. Click OK.
5. On the Schedule Script Status page, click Refresh to check the status of the update.
- The Status column displays Complete after the update.
Setting up the dashboard
1. Click Personalize Dashboard.
2. Click or drag and drop the Custom Portlet item.
3. In the Custom portlet, click Set Up.
4. In the Custom Content Pop-out, in the Source Dropdown select Tiles
2. Reminders
Reminders can be set up for important data or tasks in NetSuite. If you do not see a Reminders portlet on your dashboard, click Personalize in the upper right corner of your dashboard. You can also use Personalize Dashboard in the Settings portlet.
- On the Standard Content tab of the Personalize Dashboard palette, click the Reminders icon or drag it onto the dashboard.
- In the Reminders portlet menu, click Set Up.
- Click a reminder in the left list or drag it to the Current Selections list on the right.
- The reminders are arranged alphabetically. Custom reminders are marked with a ‘c’.
- Add all the reminders that you would like, then click save.
Tips and Tricks for Reminders
1. Change the order by dragging and dropping the items
2. Drag reminders under the ‘Headline’ section to headline a reminder
3. Select ‘Show reminders with zero results’ if you want to see all reminders regardless of results
3. Key Performance Indicators
The Key Performance Indicators portlet displays data from reports over different time ranges or from saved searches, including forecast, pipeline, orders, cases and financial data.
Adding the Key Performance Indicators portlet
Note: this must be done before setting up the KPI Meter.
1.. Click Personalize Dashboard
2. Click or drag and drop the Key Performance Indicators item.
- The portlet appears on the page, displaying default or previously selected KPI data.
3. In the Key Performance Indicators portlet, click Set Up to open the Set Up Key Performance Indicators popup.
4. To select standard KPIs for display in the portlet, click Add Standard KPIs to open the Choose Standard Key Performance Indicators dialog.
- Click a KPI in the left list to move it to the right list, which indicates that it should be displayed
- Click Done after you have finished selecting KPIs to display
- Selected standard KPIs are listed with question mark icons. Click these icons for KPI descriptions. For a complete list of standard KPIs and their descriptions, see Standard Key Performance Indicators Table
5. To select saved searches to display as custom KPIs, click Add Custom KPIs to open the Choose Custom Key Performance Indicators dialog.
- Click a saved search in the left list to move it to the right list, which indicates that it should be displayed as a custom KPI.
- You can choose up to 10 custom KPIs.
- Click Done when you have finished selecting KPIs for display.
- Selected custom KPIs are listed with “c” icons. Click an icon for a brief general description of custom KPIs. For more details, see Custom KPIs.
Once you’ve added your KPIs, you can determine:
- Employees
- Date ranges
- Comparison date ranges
- The order (simply drag and drop to rearrange the portlet)
Click Save.
4. Navigation Shortcuts
The Navigation portlet allows you to create shortcuts on your dashboard to areas in NetSuite that you use often.
Installing the bundle
1. Go to Customisation > SuiteBundler > Search & Install Bundles.
2. On the Search and Install Bundles page, use the following information to search for the SuiteApp:
- Bundle Name: Navigation Portlet
- Bundle ID: 186103
3. Click Navigation Portlet to display its Bundle Details page.
- For more information, see Bundle Details.
4. Click Install.
- If asked, indicate your agreement to allow NetSuite to automatically upgrade the SuiteApp in your account when updates become available.
- During the installation, click Refresh to get the latest status.
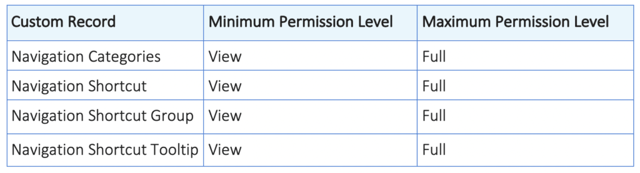
Adding roles that can use the Navigation Portlet
1. Go to Setup > Dashboard Tiles > Roles Update.
2. On the Dashboard Tiles Roles Update page, specify values for the following fields:
- Target Role – Select a target role. To select multiple roles, press and hold down the Ctrl key.
- Source Role – Select a source role.
3. Click Run Update.
4. Click OK.
5. On the Schedule Script Status page, click Refresh to check the status of the update.
The Status column displays Complete after the update.
Create a Navigation Category
1. Go to Setup > Navigation Portlet > Manage Shortcut Group > New.
2. In the Assign to Category field, select New from the list or click the + icon.
3. In the Name field, enter a name for the navigation category.
4. Click Save.
Creating a Shortcut Group
1. Go to Setup > Navigation Portlet > Manage Shortcut Group > New.
2. Provide values for the following fields:
- Name – Enter a name for the shortcut group.
- Assign to Category – Select a navigation category where you want to assign the shortcut group, assign it to the category you created in the previous step.
- Shortcut Group Display Order – Enter a numeric value to define the display order of the shortcut group.
For example, if you enter 1, the shortcut group is shown as the first column in the navigation portlet. The display order of the shortcut groups is based on available columns. If two or more shortcut groups have the same display order, the system displays the shortcut groups in alphabetical order. - Icon – Select an icon for the shortcut group.
Image files must be uploaded to the File Cabinet. If possible, use a square image. The system automatically adjusts the size to 60 × 60 pixels. - Display Shortcut Groups to All Roles – Check this box to make the shortcut group visible to all roles.
When this box is checked, the Role field becomes read-only. - Role – Select at least one role that can access this shortcut group.
To select multiple roles, press and hold down the Ctrl key.
3. Add shortcuts to the shortcut group:
- Navigation Shortcut Name – Enter the shortcut name.
- Shortcut Display Order – Enter a numeric value to determine the display order of the shortcut in the shortcut group.
- Link – Enter the URL of the shortcut.
- Click Add.
- Repeat steps a through e to add more shortcuts to the shortcut group.
You can add up to 5 shortcuts per shortcut group.
You can copy the URL’s of the shortcuts that you already use to create a shortcut group.
4. Click Save.
Setting up the dashboard
1. Click Personalize Dashboard.
2. Click or drag and drop the Custom Portlet item.
3. In the Custom portlet, click Set Up.
4. In the Custom Content Pop-out, in the Source Dropdown select Navigation Portlet
5. Trend Graphs
Trend graphs allow you to see how your KPIs are performing over time, such as a monthly sales trend or a monthly payables trend.
Setting up a monthly sales trend
1. Click Personalize Dashboard
2. Click or drag and drop the Trend Graph item.
3. In the Custom portlet, click Set Up.
4. In the Trend Graph Pop-out;
- Set a name for the portal – Monthly Sales Trend
- Select Column for chart type
- In KPI select Sales
- In Trend Type set Monthly
- Check Show Moving Average
- Period to Calculate Moving Average, set to 2
- Check Show Last Data Point
- Chart Theme set to Global Theme
- Background Type set to Global Background
5. Click Save
6. Financial Overview
With a KPI scorecard portlet, you can compare data across multiple KPIs, including displaying a financial overview of your business.
1. Click Personalise Dashboard.
2. Click or drag and drop the KPI Scorecard item.
3. In the KPI Scorecard, click Set Up.
4. In the set-up pop out:
- Set KPI Scorecard to Financial Overview
- Restrict to All
- Set Orientation to KPIs on Left
- Check Show Trend Graph Icon
5. Click Save
7. KPI Meter
A KPI meter allows you to visually see how your KPIs are tracking.
1. Click Personalise Dashboard.
2. Click or drag and drop the KPI Meter item.
3. In the KPI Meter, click Set Up.
4. In the set-up pop out:
- Range This Month
- Check Compare
- Compare Range Last Month
Annexa is a leading NetSuite partner with extensive experience designing and implementing comprehensive and customised business systems, including payroll solutions, financial management, warehouse management and ecommerce solutions