Intercompany Cross-Subsidiary Fulfillment
The Intercompany Cross-Subsidiary Fulfillment feature will allow organisations to fulfill orders and receive returns across multiple subsidiaries. This means you will not be restricted to a fulfilling location regardless of the originating sales subsidiary.
For example…
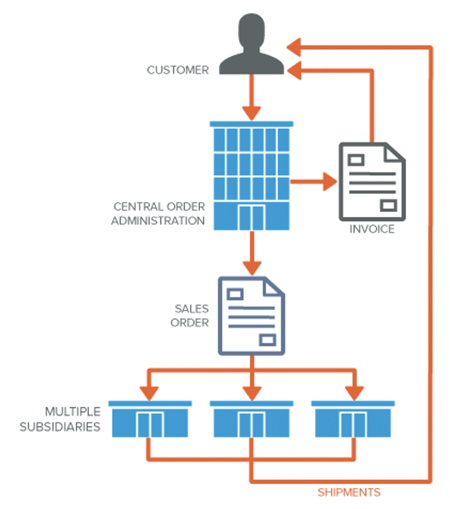
Your process may include having one subsidiary managing orders and sales for the entire company. If you have distribution centres in many subsidiaries, an order can be fulfilled from one or more locations within or outside the subsidiary of sale.
When a sales order is entered, individual lines on that order can be assigned to a specific subsidiary, and a specific location within that subsidiary for fulfillment. This means you are not restricted to the subsidiary where the sales order is raised.
This feature aims to eliminate the need for drop ship orders and transfer orders between subsidiaries, resulting in reduced accounting steps to process these transactions.
The feature for this functionality is titled ‘Intercompany Cross-Subsidiary Fulfillment’ once enabled you’ll be able to set up the intercompany process.
There are two scenarios that exist using this feature:
1) Fulfill a sales order from multiple locations in multiple subsidiaries.
2) Fulfill multiple sales order from multiple subsidiaries from one location within another subsidiary.
We’ve prepared an example to demonstrate the functionality of this feature.
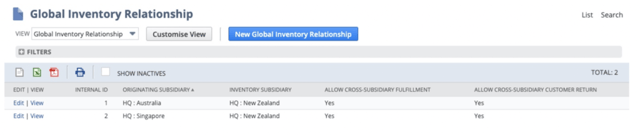
In our example, HQ : New Zealand is our fulfilling inventory, meaning the subsidiary that holds our physical stock.
HQ : Australia and HQ : Singapore are Sales Subsidiaries, meaning they do not store physical stock and must rely on HQ : New Zealand to provide the inventory for the order.
This information is stored in a ‘Global Inventory Relationship’
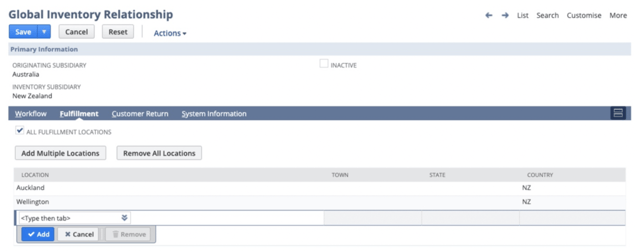
When creating a Global Inventory Relationship, you can select which locations are available for Intercompany Cross-Subsidiary Fulfillment.
This selection can be defined for both Customer Returns and Fulfillments.
Once the Global Inventory Relationships are created, we’ll be able to create Sales Orders to follow this process.
In this example, we will be raising an order within the HQ : Australia subsidiary, and the stock will be fulfilled by the HQ : New Zealand subsidiary.
We’ve entered these details against the Sales Order:
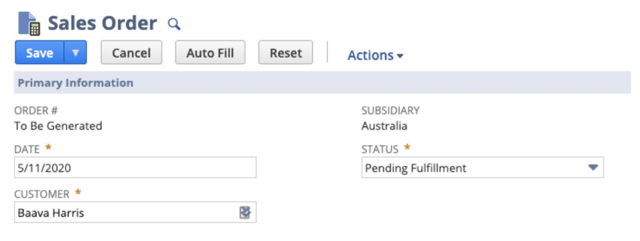
When entering the Item lines, you’ll notice a new checkbox titled ‘Allow Cross-Subsidiary Fulfillment’.
Enabling this within the Sales Order will allow you to select an Inventory Location from any subsidiary as detailed within the Global Inventory Relationship records.
Within our example, we have selected ‘Auckland’ as our Fulfilling location, which exists in the New Zealand subsidiary.

If you add additional lines to the order, you’ll notice that this setting can be changed on a per line basis.
We’ve gone ahead and added a second inventory item, which will be fulfilled by the Sales subsidiary – Australia.

Once the Sales Order is generated, it is as simple as processing the Item Fulfillment for this order.
When fulfilling a Sales Order which requires Inventory from multiple subsidiaries, you’ll be directed to the Bulk Fulfillment screen.
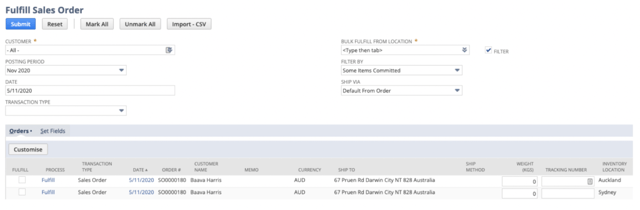
It is recommended at this screen, to click the ‘Fulfill’ on the line level to process the fulfillment on a per subsidiary basis. The differing subsidiaries are represented by the ‘Inventory Location’ field.

Clicking the fulfill link on the line level will take you to the standard Item Fulfillment page, from here process the Item Fulfillment as usual – You’ll see that this fulfillment is for the Sales Order that was raised in the Australian subsidiary, but is fulfilled from the Auckland location within New Zealand.
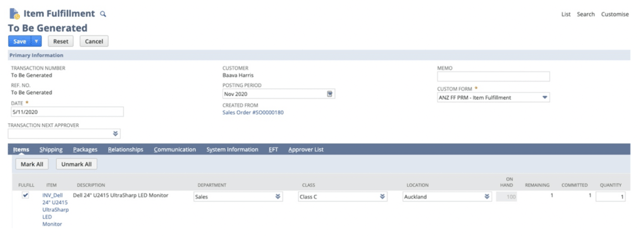
In terms of inventory movement, this is now complete – you’ve successfully fulfilled stock from a subsidiary that exists outside of the subsidiary that has processed the sale.
This brings us to the second part of this tips & tricks guide:
Generating Intercompany Cross Charges
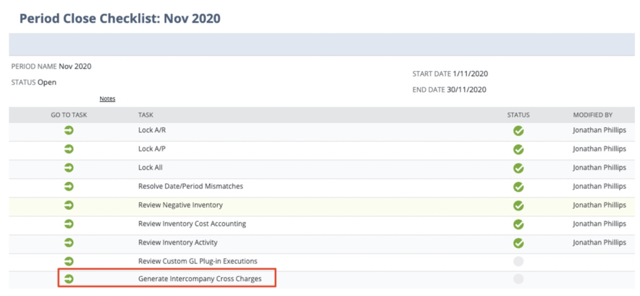
When you enable the Intercompany Framework feature, NetSuite adds a task within the Period Close checklist called ‘Generate Intercompany Cross Charges’.
This task generates cross charges between subsidiaries when intercompany subsidiaries provide goods or services to each other, in our example this is used when a subsidiary has created a sale which has fulfilled by another subsidiary.
The generate intercompany cross charges tasks generates a pair of automatically approved cross charges, which are read-only intercompany transactions. These cross-charge transactions balance intercompany payables and intercompany receivables for the goods and/or services provided.
This task is done automatically at the end of each accounting period.
Prior to generating the intercompany cross charges transactions, you must ensure that the Intercompany Preferences are configured correctly.
To do so, navigate to Setup > Accounting > Intercompany Preferences.
On this screen, detail the required accounts and settings. Ensure the accounts selected are Intercompany Elimination accounts. (This is enabled by a checkbox on the Chart of Account record)
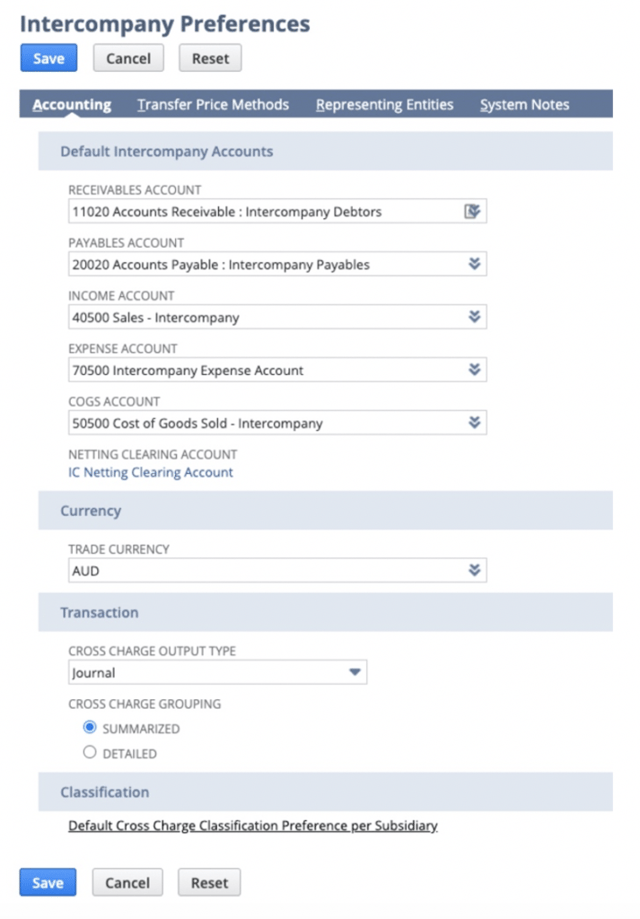
At this point, confirm the preferences you’ve selected to ensure the output of the automation is summarised or detailed on the journal entry.
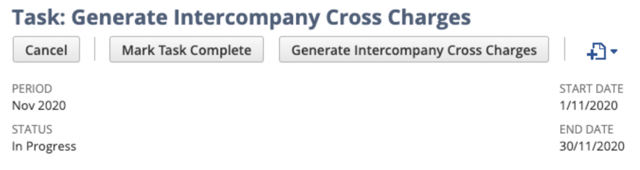
When you’ve entered the ‘Generate Intercompany Cross Charge’ section of the Period Close checklist, you’ll be prompted to generate transactions.
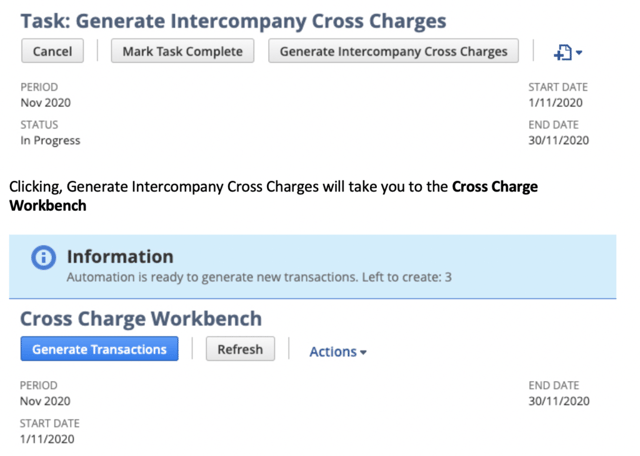
NetSuite will indicate how many cross charges are left to generate for the month, based on your intercompany fulfilled.
When you click Generate Transactions NetSuite will run the process and show you the results.
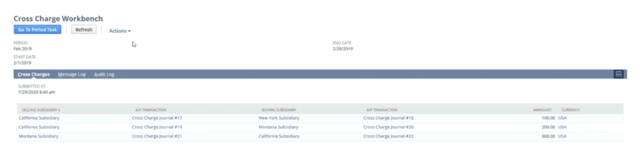
Please note that the below transactions are different to the ones created above in the first section.
Notice here how there is a single journal created for A/R and a corresponding one created for A/P.
Clicking into any Cross Charge Journal, you’ll see the output:
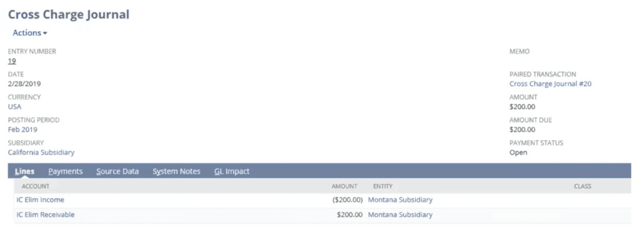
These transactions are automatically linked, to debit and credit the correct accounts in the correct subsidiaries. In addition, these transactions are automatically reconciled.
Once you’ve reviewed the automatically generated cross charge journals, you can finalise the task.
If for whatever reason you need to delete the transactions, you can hover over the action’s menu:
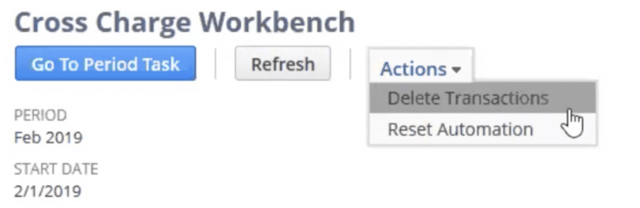
In addition, if you run into any errors when using this process and the transactions fail to generate. Then click the Reset Automation action.
The Reset Automation deletes all transactions and does all the calculations again from scratch based on the underlying records and preferences of your intercompany setup. It is recommended to use this setting when you need to make changes to the underlying records.
In addition, the Messages Tab will display any error messages you encounter. These may detail accounting requirements, such as missing intercompany accounts. You’ll need to resolve these issues before using the Reset Automation action as mentioned above.
Once you’re completed with this task, and happy with the output click Go to Period Task
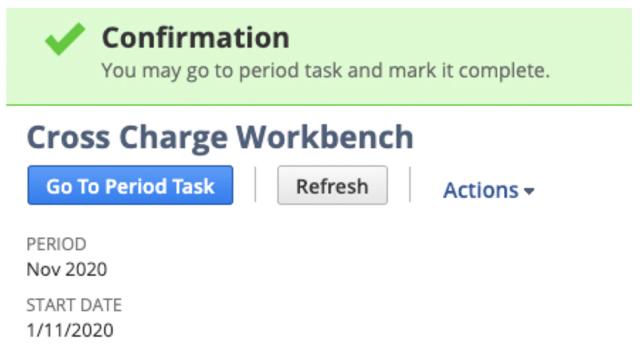
Then click Mark Task Complete.
That brings us to the end of this tips & tricks article, we hope you’ve learnt something! Annexa recommends changes be tested in Sandbox prior to implementation.
If you have any further questions, please reach out to the AnnexaAssist team at support@annexa.com.au
Annexa is a leading NetSuite partner with extensive experience designing and implementing comprehensive and customised business systems, including payroll solutions, financial management, warehouse management and ecommerce solutions.


